Wednesday, May 18, 2011

towel bib

http://sewmuchado.blogspot.com/2010/09/tutorial-sleeved-toddler-bib.htmlSo go and find yourself some hand towels, and let's get started!

Materials:
hand towel (the larger the better -- I found the white one pictured in these instructions at Ikea for a whopping 50 cents -- places like Ross and TJ Maxx are great too)
knit scraps (rib knit works best) - cut a 12"x3" piece

Instructions:

1. Using a bowl or other object approximately 5-6" in diameter, trace a circle in the middle of the towel, 6" from one end. I know, white is not a smart choice for a bib, but I had the towel on hand (obviously shoved in my sewing stash), so I thought I'd use it as a tester :).

2. Place knit right sides together, matching short ends, and stitch in place using a 1/4" seam allowance.

3. Turn knit right side out and fold in half , matching raw edges.

4. Baste raw edges together. This will be the collar.

5. Mark middle of collar by folding in half at seam. Use these marks to evenly pin collar to circle, with the folded edge towards the outer edges of the bib.

6. Stitch collar to towel, keeping your stitch line just outside of your traced circle.

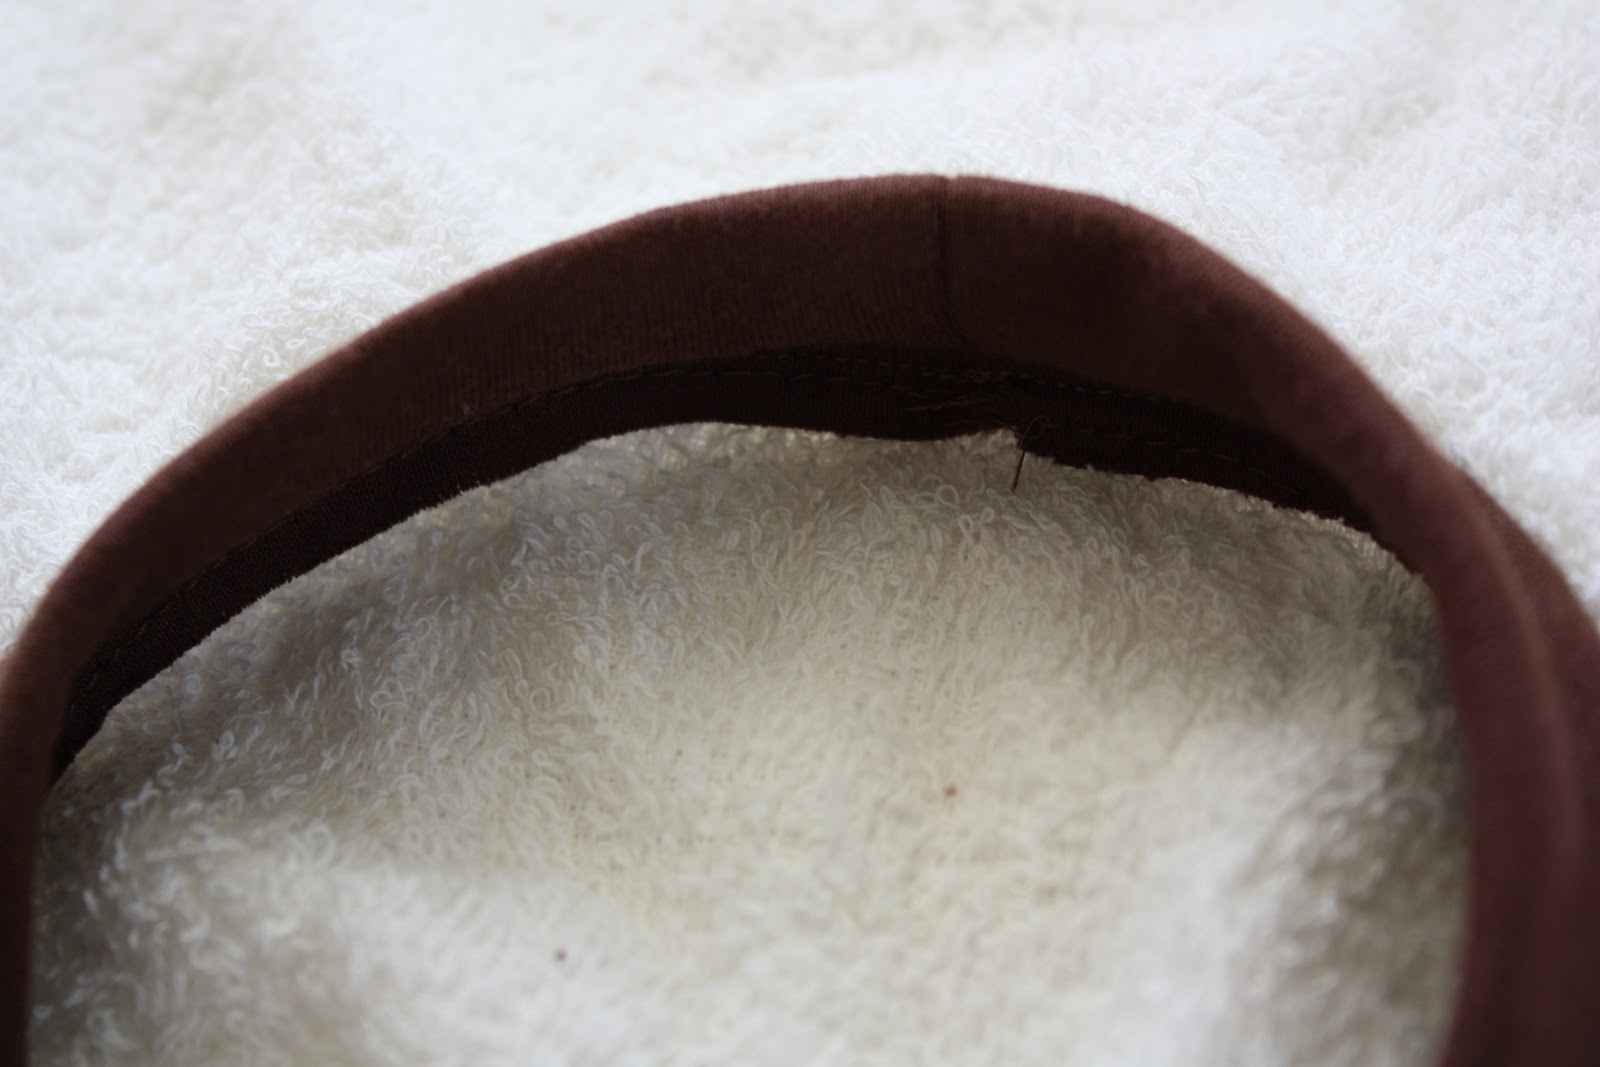
7. Carefully cut away inner circle of towel. Note: If you have a serger, you can leave a little excess towel seam allowance. If you do not have a serger, cut the towel seam allowance to match the collar seam allowance.

8. Finish inside collar seam allowance by serging raw edges or using a zig zag stitch.

9. To form sleeves, turn bib front toward bib back, folding at the mid-point of the collar. Stitch lines approximately 1" long along side edge on each side of bib back to secure sleeve openings.

10. To form optional pocket, fold bottom edge of front side of bib upward approximately 3-4". Stitch in place along edges of bib. Note: As pictured, you may need to stitch 3/4" or so in from edge if the fabric along the edge is too thick to stitch through.

Make a few -- your kids will love not having a scratchy plastic bib on their necks.


...And you'll love the bib staying on your little ones :).


I'll be linking to some of these fabulous linky parties!

DIY bookshelf from picture frame

http://poppiesatplay.blogspot.com/2011/04/framed-picture-converted-into-hanging.htm
This is actually a refashion of a refashion...

I found this picture for a few dollars a year or so ago and turned it into a colorful magnet board.


In the time that we've had this I think that the kids have used it a total of zero times to hang pictures.
I guess we're just not a magnet board kind of family.


What I was really needing is a bookshelf for my bookworm's room,
so once again I pulled the picture apart.


I measured the size of the frame and cut 6'' pieces of mdf to create box and shelves.


I glued and nailed 3'' pieces to the bottom of the shelves to use as hanging support boards.


After which I tacked the box and shelves into place.


I nailed the frame from the picture onto the front of the bookshelf and painted it all white.


Here she is up on the wall.


I did have to put caulk around the edges to fill a little bit of a gap.


Although it was a fun project, if you don't already have a picture frame or access to an inexpensive one, it would probably be more cost effective just to buy moulding a make a frame yourself.


I'm so excited to have a place for Liv's books!

tutus & tulle bows

http://samstermommy.blogspot.com/2009/12/tutus-tutus-everywhere.htmlI don't know how it happened, perhaps there truly is something in the water, but all of my girlfriends have little girls. Instead of going to the store & buying 5 baby dolls I decided to make them all tutus & matching hairbows.These pom pom tutus are Christmas presents for Samster's little Florida friends, Serena & Ava, who we'll be visiting next week. The instructions are just like the ones for the Ice Princess TuTu but with pompoms instead of snowflakes. I saw these at a boutique for $40 the other day & about died. Then I ran across this website selling them for $60! SERIOUSLY?!?

I followed Martha's measurements for Ava's (she's 2) but for Serena's (3 mths) I cut off 4" from the length & shortened the smaller ribbon length to her waistsize plus a few inches for room to grow.
These are for Sam's friends Nicole & Erin. I used the "ten minute tutu" instructions & simply shortened the tulle length for the infant one.

Tutus look ADORABLE stuffed in a giftbag, like a bag of pink frilly goodness!
I think they liked them...Oh! I almost forgot my favorite part! Use your leftover strips for matching hairbows...here's how...
Cut a small strip of tulle to around 3" wide by 6" long & tie it into a bow.Next take a piece of felt & hot glue it to a hairclip.
Trim the felt to the size of the clip & glue bow ontop. That's it!

door knob hangers


img_9390

http://www.designspongeonline.com/2009/07/diy-project-morganes-drawer-hangers.html

this fun diy project comes from berlin-based d*s reader (and molecular biologist!) morgane rouault. when she’s not busy with her job in research science, morgane like to draw, work with pottery and sew all sorts of craft projects. so i was thrilled to hear from her about this fun DIY project she recently finished- a wall hanger installation that uses boards designed to look like drawers (you could use real drawer fronts as well). morgane was kind enough to share her full project instructions with us, so i hope you’ll enjoy her project! thanks, morgane!

CLICK HERE for the full project instructions after the jump!

[have a diy project you'd like to share on d*s? just shoot me an email right here with your pictures and instructions]

img_9389

what you need:

-recycled wood boards (you can use real drawer fronts if you have any around the house)
-wood saw
-wood paint
-glue for wood and paper (i used scenic accents glue for modelling)
-brushes (i used a small roll)
-nice handles (you can find them at anthropologie but they are expensive, i found mine at the mauer park flea market in berlin for 2 euros each)
-small metal saw
-nice and colorful gift wrap
-drill
-dremmel (can be substituted by a manual hole maker)
-nails
-hammer

img_9392

how to:

1. cut wood rectangles at the desired sizes (the size of my pieces spans from 15x7cm to about 30x25cm)

2. paint the best face of the wood rectangles (no need to paint the sides)

img_9394

3. drill holes at the diameter of the screws from the handles in the middle line of your wood rectangles. choose which combination you will use for your faux drawer and drill holes in the two chosen wood rectangles using the exact same distance between the two holes.

4. the largest rectangle needs a little more work. in order to have your hanger really touching the wall, flat, you need the handles to be screwed and fixed inside. therefore you will have to drill half-way through the larger rectangle to be able to insert the bolt, and this with a larger drill. be careful not to drill to much. otherwise the handle will not hold the two wood rectangles together.

5. once the holes are made, verify that they are big enough.

6. you also need to make 2 more tiny holes on the back of the larger wood rectangle, to attach your faux drawer on the wall. those holes need to be slightly wider than the diameter of the head of your nails. now you need to work on the handles.

7. using a small metal saw. cut the handles at the same width as your 2 wood rectangles taken together. handles are ready.

img_9400

8. it is time to decorate the sides of your drawer. i used leftover gift wrap from Kates Paperie. cut bands the size of the sides and glue them. you can also paint, or add ribbon…. let everything dry for few hours.

img_9402

9. make holes in your wall

10. insert your hangers on the wall, you can arrange several of them, vertical, horizontal, long, large…

Wednesday, April 6, 2011

cute cupcake idea

Let her eat cake


First birthdays are so fun. There are so many milestones in that first year. It has always been a tradition in my family to get pictures of the birthday baby smashing cake into her mouth. For me that just means a few snapshots in the highchair. As a photographer, my sister takes it to a new level. So, one final post here of my adorable niece enjoying her birthday cake while sporting her birthday bloomers and mostly NOT wearing the birthday hat I made to go with them.

owl applique

http://www.box.net/shared/kchpi0l636
http://alisa-thesweetlife.blogspot.com/2010/02/sweet-owl-pattern.html

Sweet Owl Pattern

A few of you had indicated interest in the pattern for this little owl shirt I made


........so I finally got the pattern done and you can go here to download it.

Tuesday, March 22, 2011

Amazing Homemade French Bread

I LOVE french bread. Any crusty bread for that matter. Dallin too. We could eat an entire loaf together in one sitting if we tried. I found this recipe for french bread rolls awhile ago and it's been a staple in our house ever since. I made it without a bread maker, but received a new bread maker for Christmas and make it even more with that! Just set it on the "dough" cycle, then shape, raise another 30 minutes and bake. It turns out amazing every time!
One recipe will make one large loaf of french bread or two smaller loaves, or one smaller loaf and 8 mini loaves, or 15 rolls. We've made all sorts of combinations :)

The little mini loaves are perfect for big sandwiches. I like using the rolls in the kid's lunches. I even made a batch of "green" rolls for St. Patrick's Day. The boys thought it was pretty cool that the a sneaky little leprechaun made rolls in our kitchen late at night, but said that he sure left a mess. Maybe that sneaky little leprechaun wasn't feeling that great and was too tired to do the dishes ;)


French Bread Rolls

1 1/2 cups warm water

1 tablespoon active dry yeast

2 tablespoons white sugar

2 tablespoons vegetable oil

1 teaspoon salt

4 cups bread flour
In a large bowl, stir together warm water, yeast, and sugar. Let stand until creamy, about 10 minutes.

To the yeast mixture, add the oil, salt, and 2 cups flour. Stir in the remaining flour, 1/2 cup at a time, until the dough has pulled away from the sides of the bowl. Turn out onto a lightly floured surface, and knead until smooth and elastic, about 8 minutes. Lightly oil a large bowl, place the dough in the bowl, and turn to coat. Cover with a damp cloth, and let rise in a warm place until doubled in volume, about 1 hour.

Deflate the dough, and turn it out onto a lightly floured surface. Divide the dough into 16 equal pieces, and form into round balls. Place on lightly greased baking sheets at least 2 inches apart. Cover the rolls with a damp cloth, and let rise until doubled in volume, about 40 minutes.
Meanwhile, preheat oven to 400 degrees F.

I always brush with an egg white mixed with 2 T. water before baking.
This makes the crust golden and crusty.

Bake for 15-18 minutes in the preheated oven, or until golden brown. Brush with butter.