Friday, May 7, 2010

Tomato-Basil Chicken


Tomato-Basil Chicken
by Stephanie Jensen

1 T. Butter
1/2 c. finely chopped onion
1 can (14 oz.) Italian seasoned tomatoes (if not already cut up, coarsely chopped)
1/2 c. julienned FRESH basil leaves
1/2 tsp salt
1/2 tsp freshly ground pepper
4 boneless, skinless chicken breast halves
1/2 c. heavy whipping cream


Preheat oven to 450 degrees. Heat butter in skillet. Add onion and cook over medium heat until translucent, 5 min. Increase heat to high; add tomatoes and cook until liquid is almost evaporated, 5-10 min. Add cream and bring to boil; boil until slightly thickened, approx 3 min. Stir in basil, salt and pepper. Arrange chicken in shallow baking dish; pour sauce on top. Bake for 20-25 min.(Serves 4)


Cashew-Rice Pilaf
by Stephanie Jensen

1/4 c. butter
1/3 c. finely chopped onion
1 c. uncooked regular long grain rice
2 c. chicken broth
1/2 - 1 tsp salt
1/2 c. cashews, coarsely chopped
1/4 c. chopped FRESH parsley


In large saucepan, melt butter. Sauté onion until soft. Add rice; stir until coated. Stir in broth and salt. Cover; simmer 24-30 minutes until rice is tender and liquid is absorbed. Stir in cashews and parsley.(Serves 4)

Almond cookies

My mother-in-law introduced me to these. When I think Almond cookie I have to admit I am not immediately jumping for joy but these suckers proved me wrong. They melt in your mouth. They are supposed to be smaller and thicker almost like a thick Checker but this was the first batch and the second batch was gone before I could snap a picture.


Almond Cookies

by Joann Law


Blend:
1 Cup butter
3/4 Cup sugar
1 tsp. Almond extract
In a separate bowl mix:
2 cups flour
1/2 tsp. baking powder
1/4 tsp. salt
Add the flour mixture 2 T. at a time to the wet ingredients.
Roll into small balls, flatten with the bottom of a glass just slightly. Cook for 7 minutes (they will not look done) at 400 degrees on a lightly greased pan. Cool cookies until they are just warm and place sliced almonds on top of each cookie. Drizzle a spoonful of glaze on top of the almonds and cookie.
Glaze:
1/2 Cup powdered sugar
1 tsp. almond extract
4-5 tsp. water

Buffalo Chicken Dip

Football Kickoff - Buffalo Chicken Dip


Buffalo Chicken Dip
by Kim Denney
1 (10 ounce) can chunk chicken, drained (I use one 12 oz can from Costco)
1 (8 ounce) package cream cheese, softened
1/2 cup Ranch dressing
1/2 cup Buffalo wing sauce (such as Frank's Red Hot, not to be confused with their pepper sauce. Start with less if you want and add more to your desired hotness.)
3/4 cup shredded Cheddar cheese
blue cheese crumbles (optional)

Heat chicken and Buffalo sauce in a skillet over medium heat, until heated through. Make sure to break up the chicken so there are no big chunks. Stir in cream cheese and ranch dressing. Cook, stirring until well blended and warm. Mix in shredded cheese. From here you are actually supposed to stick it in a 350 degree oven for 15 minutes. Since we are always in a hurry we just sprinkle more cheddar cheese and blue cheese crumbles and microwave it until the cheese melts. The blue cheese is a little much for some people so we usually only sprinkle it on half. Serve with chips.

Chocolate Chip Cookie Dough Cheesecake Bars

Just the name of these make your mouth water. A graham cracker crust with mini-chocolate chips in it topped with a layer of cheesecake and then loaded with drops of cookie dough. A drizzle of chocolate on top makes it out of this world. You'll have to thank Bake or Break for introducing us to this thigh expanding treat. It has a lot of components and sometimes less is more, but not in this case. Heaven.


Chocolate Chip Cookie Dough Cheesecake Bars

by The Essential Chocolate Chip Cookbook

Crust
1 1/2 cups graham cracker crumbs
5 Tablespoons unsalted butter, melted
2/3 cup miniature semisweet chocolate chips

Preheat oven to 325°. Butter a 9″-square baking pan (*I used an 8x11 pan). Line pan with parchment paper, leaving enough to extend over the sides. Butter the parchment paper. Combine graham cracker crumbs and butter until crumbs are moistened. Make sure you mix it well so that the crust isn't too crumbly. Stir in chocolate chips.

Press crust mixture into bottom of pan and 1 inch up sides. Bake for 6 minutes. Set pan on wire rack to cool.

Cookie Dough
5 tablespoons unsalted butter, at room temperature
1/3 cup packed light brown sugar
3 Tablespoons granulated sugar
1/8 teaspoon salt
1 teaspoon vanilla extract
3/4 cup all-purpose flour
1 cup semisweet chocolate chips

Using an electric mixer , mix butter, brown sugar, sugar, salt, and vanilla extract at medium speed until smooth. Decrease mixer speed to low and add flour (Add a little at a time. You might not need all the flour. Just add it until the mixture sticks together). Mix just until incorporated. Stir in chocolate chips. Set aside.

Filling
1/4 cup granulated sugar
1 large egg, room temperature
1 teaspoon vanilla extract
10 ounces cream cheese, at room temperature

Using an electric mixer, beat cream cheese and sugar just until smooth. Add egg and vanilla extract, beating just until blended. Pour batter into baked crust. Drop cookie dough by teaspoonfuls over the top of the filling. It will seem like a lot of cookie dough but you want some in every piece. Bake about 30 minutes at 325 degrees, or until set. Transfer to wire rack.


For chocolate topping, melt 1/3 cup semisweet chocolate chips in a double boiler or in the microwave. *I think it's easier in the microwave. Put in a ziplock bag in a microwave safe bowl and cook for 30 seconds at a time, mixing within the bag after each interval. Snip off the corner of the bag and drizzle. Add about 1/2 tablespoon of butter if necessary to make chocolate smooth. Drizzle over top of bars.

Cool bars in pan completely, about an hour.
Using the edges of the parchment paper, remove bars from pan. Cut into bars, keep cool in the refrigerator and serve.

Wednesday, May 5, 2010

Pillow Top Towel

http://haileysteadman.blogspot.com/2009/10/towel-thats-puffy-for-baby.html

Pillow Top Towel

It's the best name I can come up with, so that's what I'm gonna call it.

*I've been thinking about this project for quite a while, so I hope you like it! *

This towel is for a baby to lay on after his bath. It's absorbent, soft and fluffy. It has a blanket like quality, yet it's a towel. It is perfect for cushioning a hard surface (like the floor or a counter top) while drying, lotioning and dressing a baby. Heck, I need to make one for me now.

Here is the one I made for Cohen (the cutest dang baby I've ever seen!)


And here (not wrapped yet):


Here is what you do. First find a towel without any ribbing. I found mine at JC Penney. Fold in half. If you want to do some applique, do it before the next step.

After you applique, fold in half, right sides together. Sew around edges. Leave 6 - 8 inches in the top-middle open.

Cut batting to the size of the towel.


Fold batting in thirds and insert into the opening in the top.


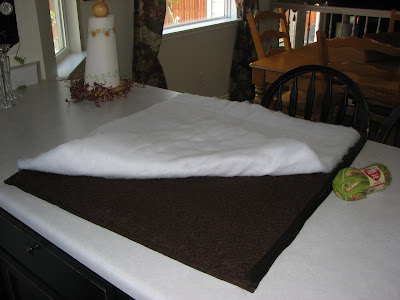
Open batting in the towel and smooth flat. Hand stitch the opening at the top closed.

Quilt the towel with a large blunt needle and the yarn of your choice.


I placed quarters on the towel to map out where I wanted to thread the yard.


After you thread and knot your ties, cut with scissors to desired length.


That's it. A soft, puffy towel for baby.

Monday, May 3, 2010

Floor Cushion

http://3punkmom.blogspot.com/2010/05/tutorial-land-of-nod-inspired-floor.html


Tutorial: Land of Nod inspired Floor Cushion


After browsing page after page of Land~of~Nod and Pottery Barn Kids for years, I've decided to take the bull by the horns and make my own stuff!
First on the list:
One Seater Floor Cushion
If you'd like to make your own, here's what you'll need:
  • 1 yard Home Dec Fabric
  • 2 pkgs. 1/2 " pre made piping
  • Contrasting Thread
  • 16oz. Fiberfill
I started first by drawing my own 17" diameter circle. I had searched the internet for a template to just print out, but couldn't find. Thankfully, for some unknown reason, I had a thingamajig compass in my craft storage. So, I reverted back to 5th grade and figured out how to make a nice round 17" circle! It was super easy...you can too!
Next, cut out all your pieces.
You will need:
2 of the 17" circles (top and bottom)
1 piece cut at 9"x51.5" (side) **you will have to piece this together if your fabric is 45"**
2 pieces cut at 3" x 12" (handle)
Begin by pinning your bias tape directly on to one of the circles,
making sure to line up raw edges
When you get to the end, overlap pieces and bend them at an angle
Using a contrasting thread, stitch right on top of the stitiching that is on your pre-made piping. Make sure to use a contrasting thread that is easy to see on the wrong side of your fabric (this will make sense later).
Sew both circles this way
Now lets work on the handle. Lay the piping on the right side of either lengthwise side and pin in place, matching raw edges. Sew in place.
Place the other handle piece on top and using your previous stitching as a guide (this is where the contrasting thread comes in handy), stitch the two pieces together on the sides only, leaving about 1/4" from the sides free so it is easy to fold under once you turn right side out.
DO NOT STITCH THE ENDS CLOSED!
Turn the handle right side out and fold in the small ends, iron if needed. Edge stitch in coordinating thread on the small ends to close
So this is what you should have so far! Pretty!
Now lets move on:
Take your large side piece and pin it carefully to one of the circles,
right sides together and matching raw edges.
Make sure to leave about 1" free on the end. Do not pull too hard, and make sure to compensate for the curve of the circle
Pin all the way around until you come to the other end.
You will see that your two pieces will come together nicely.
Pin the width-wise seam together and sew a 1/2" seam. Once that is sewn,
finish pinning the rest down to the circle
Now, again using your previous stitiching from when you sewed
on the bias tape, stitch right on top
to sew the two pieces together
Turn right side out and position where you want your handle.
I just centered it on one side and pinned into place
Double stitich around for reinforcmenet and stitch an X for extra strength
Turn wrong side out again and pin the other circle just like the other one. This time leave an opening wide enough to turn and stuff with fiberfill. Stitch in place, again, using the contrasting stitching as a guide
Turn right side out and fill with fiberfill.
Hand stitch closed and you're DONE!!

Now, go make your punks some floor pillows to sit on
or use as a table
or to just lug around
Please let me know if you make one..I would love to see :)


Cupcakes with filling

Everyone always asks about my Cupcake Recipe so I thought I'd create a tutorial sharing my recipe and tricks!

Ingredients needed:
  • Favorite chocolate cake mix(Follow instructions on box)
  • Frosting~Home made or store bought

Filing ingredients:

  • 1 box cream cheese
  • 1 egg
  • 1/2 bag of mini semi-sweet chocolate chips
  • 1/4 cup sugar
First make the cake mix per the box instructions.

Once the batter is mixed as per instructions set it aside while you make the cream cheese filling.

For the filling you will need 1 box of softened cream cheese.
Add 1/4 cup of sugar

Also add 1 egg and 1/2 package of chocolate chips. I use the mini ones so more chips make it into each cupcake.Mix all the ingredients well

Next fill all the cupcake liners about 3/4 way full with the cake batter.

After you have filled all the liners with cake batter now you add the cream cheese mixture to the batter. Just take 1 rounded teaspoon of the cream cheese mixture and drop it into the center of each cupcake. I push the center down with the spoon to make sure the mixture is centered. This is what they look like right before they go into the oven. You bake the cupcakes like the directions say on the box.This is what they look like in the oven baking. Your house will smell so yummy!Out of the oven and ready to be frosted. I use store bought frosting because I never have time to make my own, but I've heard that chocolate ganache frosting is yummy. Here's an easy ganache recipe if you want to try it! FYI: Sometimes the cream cheese filling will show up on the top. Don't worry they are fully cooked and the frosting will cover it.Enjoy your yummy cupcakes. Everyone will think you are a super baker!