Monday, November 15, 2010

christmas ornament shirt


I'll admit, I was really skeptical when I pulled the heat transfer material out of the packing box. I don't own a Silhouette machine, and I had a hard time imagining how even the most accomplished crafting diva would manage to create an intricate design using only scissors. Hmmm...

As I tried to think of something simple I might be able to pull off, Jen's Painted Ornament Pillows came to mind. Light bulb moment!

I bought a red, long-sleeved t-shirt from Wal-Mart's Garanimals line for $3.50, some permanent fabric glue, and some thin Christmas themed ribbon from Michaels. Time to get to work!

I found some ornament silhouette clip art photos through Google and printed them in different sizes using MS Publisher. This is where having an actual Silhouette machine would have been handy, but didn't ruin the project for me.

I placed my ornament cut outs on the unrolled heat transfer paper to trace and cut out (they give you quite a lot!):

Once I had the shapes cut out on the transfer paper, I peeled the plastic off and laid the shapes out with the clear paper over top.

I recommend using a thin (!) kitchen towel to lay over the clear paper when ironing...this ensures that the heat will adequately adhere your transfer paper to the shirt. The Silhouette directions said to hold the iron firmly in place for 45-60 seconds. I found that it took several passes before my shapes were all the way stuck on the shirt.

Hmm...kind of bland, huh?

Time for some bling! I eye balled ribbon and rhinestones, using fabric glue to press everything into place by hand.

Saturday, November 13, 2010

PB PIE

Yummier in the Summer!
Yummier in the summer
Easy Breezy (Frozen) Peanut Butter Pie
Super easy frozen peanut butter pie
Ingredients: -3 1/2 cups (8 oz) Cool Whip
-9 inch graham cracker crumb crust
-1/2 cup strawberry jam (OPTIONAL, I don't do this part)
-1 cup cold milk
-1/2 Creamy or Chunky Peanut Butter
-1 four serving Jello Instant Vanilla Pudding
-1 four serving Jellow Instant Chocolate Pudding (OPTIONAL, this was my addition)
1. Spread 1 cup of Cool Whip in the bottom on the pie crust and freeze for 10 minutes.
2. Spoon strawberry jam over frozen Cool Whip.
3. Gradually add milk to peanut butter in a bowl, blending until smooth.
4. Add pudding mix with electric mixer at low speed (I just did this part by hand just fine). Beat until well blended, 1-2 minutes.
5. Stir in remaining Cool Whip.
6. Spoon peanut butter/vanilla pudding/Cool Whip mixture over jam in the pie crust (or if you skipped the jam, the Cool Whip).
7. Freeze until firm, about 4 hours.
Even the little one loved it!
Now, we like it frozen, it's kind of like icecream, but we liked it best when we let it thaw out in the fridge. And it was even yummier when we added some Chocolate Instant Pudding on top......it was like a light tasting peanut butter cup. Yum!
Even better with chocolate on top
Now, DIG IN!!!!!!!!!

safe to eat raw cookie dough

Safe to Serve RAW Cookie Dough Recipe!


Who doesn't *LOVE* to eat raw chocolate chip cookie dough?

It's a delicacy at our house!

But would you serve it to your guests?


What if I told you I had an awesome egg-free cookie dough recipe, which made it not only safe to eat... but safe to serve to your family, friends and guests? My sister and I have been on a quest to find the *BEST* raw cookie dough recipe and after testing several... this one was the winner by a landslide!


Plus, did you know cookie dough tastes even better when it's dipped in chocolate?
It transforms them into amazing balls of yumminess that leave people speechless.

Are you salivating yet? Here's the recipe...


(double click on the image above to open, then right click to "save as")

I modified the original recipe slightly by increasing the vanilla to 1/2 T and the flour by an additional 1/2 cup. Here's a few ideas for you... eat it plain, dip it like I did above, mix it into ice-cream or spread it like frosting onto a chocolate cupcake! I think I'll also try making these delectable balls into Cookie Dough Pops like Bakerella does with cake!

yoga skirts

http://sewmamasew.com/blog2/?p=8450

These sweet and comfy yoga skirts are a wardrobe staple at our house. They are easy to make, fun to wear and a great way to achieve that “Just Like Me” look for moms and daughters or big and little sisters. I have made these in any size from toddler to adult since there are no pattern pieces, just a quick and easy formula to follow… So come sew along with me and use up those awesome knit fabrics you’ve been waiting to sew with!

Suggested Fabrics: Use stretch knits only: cotton interlock, jerseys, matte jerseys, lightweight double knits, stretch velvet or stretch lace, 54” to 58” wide. For the waistband, you can use rib knits or any stretch fabric that has about a 50% stretch. See note at the end for a variation on this skirt using woven cottons.

ALL SEAM AND HEM ALLOWANCES ARE 1/2”

The first thing to do is to determine your measurements. Use Figure 1 to determine your waist and skirt length. Using a tape measure, measure all around your waist (or the skirt recipient’s waist) and that number will be Measurement A. Next, measure from the hip area (just below the waist) to wherever you want the hem of the skirt to fall (mid-thigh, knee, below-the-knee, etc.) and that number will be Measurement B.

Next, using measurements A & B, we will determine the size of your skirt pattern pieces.

For the double-folded yoga waistband, take Measurement A, subtract 3 inches and divide this number by 2 to get the width of each of your 2 non-elastic waistband pieces (we make these pieces much narrower than the actual waist size because there is no elastic, so the band needs to be taut in order to hold up the weight of the skirt.) The height of each panel will be 15” for any size skirt. After all the pieces are sewn together, this will result in a 7″ band that can then be folded down in half to 3.5″, which is a perfect and comfy yoga band for all ages.

For example: My daughter’s waist measures 21” all around. So, 21” – 3” = 18” / 2 = 9”. I will cut 2 waistband panels at 9” wide by 15” tall with the maximum stretch of the fabric running across the 9” width. See Figure 2.

For the twirly skirt panel, we will take Measurement B and add 1 inch to it (1/2” for the seam allowance at the waist and another 1/2” for the hem allowance.) I normally cut my skirt panel the full width of the knit fabric for all skirt sizes… this results in a super full and twirly skirt for the little girls and a less-full, more fitted look for me. Adjust the width of this panel according to your preferred amount of fullness.

For example: My daughter likes her skirts to fall right above the knee. Her B measurement was 12”. So, 12” + 1” = 13”. I will cut her skirt panel at 13” high by the full width of the knit fabric, with the maximum stretch going widthwise. See Figure 3.

The last thing I do before sewing up my yoga skirt is to divide my skirt panel in two, widthwise. I do this because I prefer the look of two side seams on my skirts instead of one in the back. If you would rather have one skirt panel that seams in the back, you can certainly skip this step.

Now it’s time to assemble your yoga skirt.

1. Create the waistband. Place one waistband piece over the other, right sides together, and stitch or serge along both side edges (the 15” sides) with a 1/2” seam allowance, thus creating a fabric circle, Figure 4.

Then fold the waistband down in half, wrong sides together and press, creating a finished folded edge and two raw edges, as shown in Figure 5. Both side seams will be encased within the band, which is now exactly 7.5” high and about 4” narrower than your waist measurement. Set the waistband aside until we are ready to attach it to the skirt.

2. Create the skirt panels next. Lay one skirt panel over the other, right sides together and stitch or serge along both side edges with a 1/2” seam allowance, thus creating a fabric circle, Figure 6. Turn the skirt right sides out. Note: if you’ve chosen to use only 1 panel that seams in the back, then stitch or serge this back seam and turn skirt right side out.

3. Hem the lower edge of the yoga skirt using your preferred method. There are many ways to hem knits. My preferred methods include using a coverstitch machine for a more professional finish, or a lettuce-edge rolled hem on my overlock serger for a whimsical, fun look or simply by pressing up a 1/2” hem and running a zig-zag stitch on my sewing machine for a funky, home-made look.

4. Gather the top edge of your skirt. Use your longest machine stitch and sew two rows of gathering stitches along the top raw edge of the skirt panel: one row 1/8” from the edge and the second row 1/4” from the edge. Don’t backstitch at the end! You want those threads loose so you can pull and gather. Grab both bobbin threads and carefully pull to gather the top edges of your skirt, distributing gathers evenly with your fingers. Gather the fabric until the skirt’s top edge is the same width as the waistband you created in step 1, Figure 7.

Note: If you have another preferred gathering method, like using a ruffler foot or your serger, you can do that instead.

6. Attach waistband to skirt. Lay your waistband over the right side of the yoga skirt’s top gathered edge aligning side seams and keeping raw edges even. Pin in place all around, adjusting the skirt’s gathered edge to fit. Stitch or serge 1/2” from raw edges, Figure 8. Turn the waistband right side out and your MODKID Yoga Skirt is finished!

We usually wear our skirts so that the gathered area sits right above the hips and we fold the waistband down, to create that “double-fold yoga band” as you see above. Pregnant women can wear the full waistband panel stretched over their bellies for a super snugly and comfy fit.

Variation: You can make this skirt using a woven fabric like a quilting cotton, cotton lawn or voile for the main skirt panel, as long as you still use a stretch fabric for the double-folded waistband. The cutting and assembly instructions are the same, just keep in mind that quilting cottons are usually only 44” wide (not 58” like most knit fabrics) so the skirt will be less full and twirly. If you still seek maximum fullness, you can cut two full-width panels and assemble as directed. HAVE FUN!

Note: If you do decide to make the main skirt panel out of a woven fabric, it is helpful to gather the skirt a little wider than your waist (maybe even as wide as your hips) and then stretch the raw edges of your knit waistband to fit the gathered edge of the skirt when you attach it.

Regardless, it’s always a good idea to trim the gathered edge (or at least remove the gathering stitches with a seam ripper) before you wear it so that the skirt will have maximum stretch.

Always remember to use a stretch stitch or zig-zag stitch on your machine when sewing stretch garments if you don’t have a serger, to avoid broken stitches when the garment stretches over the body.

Hemming Jeans

This is what I came up with. I am by no means a professional seamstress and I just kind of fly by the seat of my pants when I sew but it works for me! And I know it'll work for you too as long as you keep these simple guidelines in mind.

1. Measure twice cut once!

2. Try them on before you cut more off!

Just ignore my unpolished toe nails! I seriously need a pedicure...

Start by trying on your jeans. I cuff mine up at where I would like them to hit.


Then take them off and measure the amount you cuffed upward. Be sure to include the original hem in this measurement! I needed to take 4 3/4 inches off. Take that number and divide it by 2.


So I needed to make it about 2 2/3. You do this because your fabric is doubled over therefore doubling whatever measurement. So yes you are sewing at 2 2/3 but there is another 2 2/3 on the back so there is your 4 3/4 inches.Only measure up to the original hem line. Do NOT include the hem in your measurement. You dont want to take any of that off!


Pin your cuff and stitch down. I usually iron the cuff so that it stays put nicely and only pin at the side seams being sure that the lines match up!


Be careful and use the inside hem as a guideline. I used a zipper foot so that I could get right up to that hem line.


See that bright blue line? That is my stitching. The closer the better but not actually on the hem!


Press your seams down and try them on! Are they the right length?


YES! Then we can serge or zig zag stitch the excess off. If not then rip the seam and try again taking them up a touch more.

Now lets get rid of that little serged tail! If you just cut it off it will eventually unravel...not fun!


Take a yarn needle or a needle with a large eye and push it through your serge.


Now stick your tail through the eye of the needle.


Finally pull the tail through the serge and trim the excess. I try to pull it through at least an inch sometimes more. It just depends on how tight the serge is!

After you have serged or zig zaged and cut the excess off then you have a couple choices. My husbands pants were topstitched back down using a thread that matched his jean color. This is probably the most secure way of finishing these.


See! Barely noticeable from a distance! I mean yes up close you can see that they have been hemmed. Honestly who is looking at your hems all day? Your kids and they really don't care!

You could also lay a strip of 1/2 inch stitch witchery between the excess serged edge (folded upward) and the jeans. Then iron down really well!

OR I suppose you could just leave it the way it is and push the excess up into the jean when you lay them out to dry. But you might have to iron them every time you washed them and that might get kind of irritating!

I used two pairs of jeans to take pictures of while doing this tutorial. The first pair was a really dark wash and you could barely see the stitching in any of the pictures. So I just used the best pictures for each of the steps. All in all it took about half an hour to hem 2 pairs of jeans!

mom/daughter party skirts

Let's just jump right in! What you'll need:
* Fabric- this can be linen (like used in the adult version) or cotton. And the amount is based on your model. Oh and wash and dry it first. You'd hate to have your brand new skirt shrink after the first time it's worn!
* Elastic
* Thread
* Scissors
* Sewing machine (and serger if you have one. If not- just zig zag your edges)
* Iron and ironing board
* And of course a cute little model to measure!

You'll want to measure around the waist and the length you want it to be.
My daughter's waist is 16" and I wanted the length to be 9"
(yes- she is a peanut!)


This is what I used for the elastic. I prefer the non-roll in a nice wide width


Alright so lets going!


The main portion of the skirt: the length you measured with 2 inches added by her waist measurement 2 1/2 times. Make sense? No. So for example- my piece was 11 inches wide (I wanted the final length to be 9) and 40 inches long (16+16+8=40).

The waist band: the length is 1 1/2 times your models waist and for width- it'll be about an inch extra to double the width of your elastic. Again- my piece was 24 inches long (16+8=24) and 4 inches wide (1 1/2+1 1/2+1=4).

Elastic: I wanted mine to come out to be 16 inches exactly so it barely fits her now. So I cut the elastic 8 inches- or half of your waist measurement.


This is what you should have:
This is your skirt and all of the material you'll need.


So we'll start by making the waistband first. It is the most time consuming part! First serge your long edges. It is easier to do this now instead of later I found out! Then we're gong to fold it in half and iron a crease. To do this, I tucked the elastic inside the fold and then if you're sewing a striped material, carefully match those stripes up so that they will be straight once finished.


After ironing a small area, go ahead and just slip that elastic out and iron a nice solid crease in the whole waistband.


We're now going to topstitch just as close to the edge as possible down the length of the whole piece to keep that crease there.


Now measure down half of your original waist measurement, add about 1/2 inch for the side seam, and pin.


You're now just going to sew straight seams that length. (so from the end to your pin) This will be the front of the skirts waistband. I wanted it to lay flat and the seams will help with it keeping its shape when washed.


Once you've finished, we're going to sew in the elastic! Tuck it right up snug in that crease/top stitching and push it as close to the seam ends as possible. Sew it horizontal now. I sewed 3 seams on the blue stripes to help keep it in place and strong against being pulled at.


Now with your elastic inside, sew a casing down the rest of the material staying pretty close to the edge of the elastic.


Oh but wait! Before you sew your whole casing, attach a safety pin through the end of the elastic and hook a ribbon (this just happened to be right nearby) through the pin. This will help you in the next step.


So after sewing the casing all the way down, we're gonna pull that elastic through. This is where the ribbon comes in handy! Now don't just try and pull that ribbon because trust me I learned, the safety pin will pop off. :) It will still work, it is just trickier threading that elastic through the casing. So instead, use it like a handle and just gently pull the material back on the elastic, pushing it back. Once you've reached the end of your elastic, sew it in place again as you did on the other end. But leave about a 1/2 inch or so for the side seam. Your waistband should look like this:


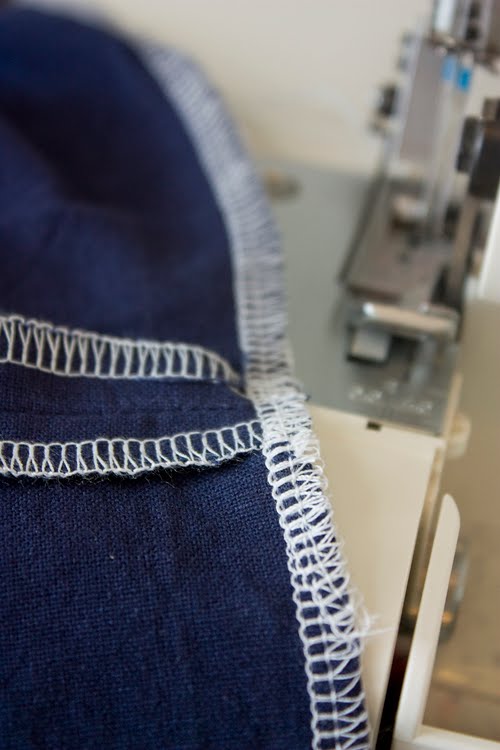
Now that the hard part is over, let's whip the rest of this skirt up! What'd ya say?
Take the main portion of your skirt and serge all edges. This isn't neccessary but it sure does give it a nice finished look when your done.


Gather the top. If you haven't ruffled before, it's easy! Lengthen your stitch to the longest setting. Loosen your bobbin. And don't backstitch! Now you're just going to sew along the top edge and then pull just one side of the strings (either your top thread or the bobbin- not both!) to gather it into a nice ruffle. One tip- break your skirt up into portions. That way if a thread breaks, it's not the whole skirt that has to be redone. You can see this in the picture below:


Now your going to pin your skirt portion to your waistband. Now this gets a little tricky. First pin the flat portion of the waistband to the ruffled skirt portion. Now when you pin the elastic portion, stretch it out! This will make your material not as ruffled as the front so that when the elastic scrunches back up, the material scrunches. And when the elastic is stretched out, the material will still look slightly ruffled. Does that make sense? Hope so!
Now sew those two pieces together where you have just pinned.


Now just iron that seam flat and iron in those ruffles a bit. Not much, just a little to help it lay nicely.


This is a great time now to check for your ruffling thread. If you see some, no biggie! Just carefully unpick it.


You're almost done!! All we have left is to sew your side seam, press that open, and then hem the skirt bottom. Yay- you have just made an adorable party skirt!


But if you want to add on the cute bow in front, don't leave me just yet. When I made my party skirt, I made a detachable sash. But that would be tricky to keep in place on a crazy little runner and dancer! So instead, I made a half of sash and attached it. We're going to first make 2 sashes. You'll want to cut these double the width of your waist band and as long as the entire waist measurement. So my two pieces: they were each about 3 inches side and 16 inches long.

Now fold each in half with the right sides together, iron this crease, and cut one end at a slight angle.


Sew around three of the sides creating a long tube. Snip your corners and flip it right side out.


Iron these again keeping those seams nice and flat.


Now just tuck in the one end to close it off and topstitch around the entire sash. I chose to finish these off with my double needle but that was just for style. Any regular topstitch would work great!


Now you should have 2 little sashes (and check your angles at this point to make sure they are laying correctly). Lay these wrong side out and pin just inside or in front of the sides. Sew back and forth a few different times on each side.


Now tie into a bow and voila! You know have a mini Party Skirt- complete with a big bow!


I love the finished look!! And with that elastic back, it'll be sure to last for quite sometime!


Front: Flat fitted look with a gorgeous big bow!


Back: nice and stretchy for easy on and off and to adjust for growth!


It is the perfect little complimentary skirt to the fitted (with a zipper) adult Party Skirt! You can check out that tutorial over at Creative Spaces.

Ok so the first step is to cut our main skirt piece. I cut mine basically in half- 22 inches in length.
(and I serged my piece before cutting it but would recommend cutting it and then serging your edges)


So now serge both sides of your skirt. This is not essential but will clean up your insides once your done. And if you don't have a serger- zig zag your edges.


Now cut your waist band. This is the measurement around your natural waist, where you want the band to sit. Add about 3/4 inch to this measurement since you'll be turning your edges under at the seam for the zipper. Now I wanted my waistband to be about 3 inches wide finished so I cut it 7 inches wide. So at this point- you should have this:

Main skirt piece at least double the length of your waist piece.


So we're now going to make your waistband. Fold in half and iron this crease in.


Now top stitch first at the very edge of your material on the crease. Can you see that seam? Then continue to sew seams about 2 inches apart to cover the entire band. This should help so that once you wash and wear your skirt, your waist band won't fold and twist. It should retain its shape well.


Now serge your edges (again to keep those seams clean) and this is what you should have:


Now we're going to ruffle the main skirt portion. In case you haven't ruffled before, don't be scared away at this point. Ruffling is super easy! Lengthen your stitch to the longest length possible and loosen your tension. Now sew a stitch- without backstitching! Then carefully pull one thread to gather your stitch. One tip that I've learned, when ruffling this long of a piece of material- break it up into 4 sections. Start and stop at 4 different points so that the ruffling is easier and more manageable in small secitons. You can see in the picture below the break between my ruffling seams.


Now attach your waistband to your skirt. Place your right sides together like this:


Sew from one side to the other. Now iron your seam flat.


This is also a great time to check for your ruffling stitch. If a little shows through- no worries! Just carefully unpick it.


Ok so now we sew in the invisible zipper. There is a great tutorial to follow here so I didn't take any pictures. And again- don't let this zipper scare you away! I was scared of zippers but seriously they are so easy and open up a whole new world of possibilities. Check out this tutorial and then come back.

So now that your zipper is sewn in and you've finished sewing your side or back seam, iron it open.


Almost done! Hang in there. You're doing great! All we have left is to hem your skirt. You can either double roll your hem or serge your edges and then hem under. Either way- its a nice clean finish.


And when I sew my hem, I don't worry about ironing or pinning it. I take the lazy way out but after I serge my edges, I just roll it and pull tightly as I sew it. Either way you choose to do it, finish off that hem and try it on! Your skirt is done. You did it!


Now you can leave it here or stick with me a little longer and add that bow. I made mine detached so that the skirt could be worn with or without it. Just so that there's the option to mix it up as wanted.

But if you'd like to make the bow- lets get started! Basically, you're going to cut yourself another waistband except leave it the length of the material- double plus some of your waistband measurement. Did that make sense? No. Simplified: Cut a piece of material 7 inches wide the length of the material. Sew it right sides together to make a tube. I wanted angled ends so I eyeballed the first end. Then for the second end, I laid the other end on top to use as a guide.


Now snip your corners and unpick a small hole in one end of your sash (or just plan ahead and leave a gap!). Turn it inside out and push your corners out. Now iron carefully making sure to help it lay flat and your seam is straight. Now just topstitch around the entire sash and voila! You're done!